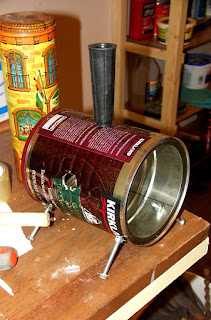
Home-Made Coffee Can Forge
I just completed my home-made forge using a coffee can, plaster of paris and some sand. The plaster mixed with the sand will make a satisfactory refractory mixture.
I still need a torch to hook up to my propane, but the forge is complete for now. These are some of the pictures of the process.
The first picture is of the can with legs and handle attached.
 The second picture is the can and the box of plaster. I used almost a full box of plaster. I figured that I would need a half of a coffee can of plaster and a half can of sand, but needed way more in the end, with very little left over. It took a lot of mixture to fill up the can.
 The third picture is the bucket of mixture ready for pouring. I got my
boy to hold the can in the middle of the coffee can in order to pur the
mixture properly. I had to make sure that the inner can was straight up
and down. The mixture was threatening to push the inner can up so I had
to put weights on it in order to keep it down.
The fourth picture is of the weights holding down the inner can so that the mixture can solidify
somewhat.
 The fifth picture is of the completed forge just after I pulled out the inner can.
The mixture is still wet, but getting solid. I only had 15 minutes to work with the can before I wouldn't be able to pull it out.
Well, next in line will be to get a torch. I already have the propane but I will need to pick up a torch similar to this one...
Then I will set it up and try it out on a knife blank. Pictures to follow!
I still need a torch to hook up to my propane, but the forge is complete for now. These are some of the pictures of the process.
The first picture is of the can with legs and handle attached.
 The second picture is the can and the box of plaster. I used almost a full box of plaster. I figured that I would need a half of a coffee can of plaster and a half can of sand, but needed way more in the end, with very little left over. It took a lot of mixture to fill up the can.
 The third picture is the bucket of mixture ready for pouring. I got my
boy to hold the can in the middle of the coffee can in order to pur the
mixture properly. I had to make sure that the inner can was straight up
and down. The mixture was threatening to push the inner can up so I had
to put weights on it in order to keep it down.
The third picture is the bucket of mixture ready for pouring. I got my
boy to hold the can in the middle of the coffee can in order to pur the
mixture properly. I had to make sure that the inner can was straight up
and down. The mixture was threatening to push the inner can up so I had
to put weights on it in order to keep it down.The fourth picture is of the weights holding down the inner can so that the mixture can solidify
somewhat.
 The fifth picture is of the completed forge just after I pulled out the inner can.
 The mixture is still wet, but getting solid. I only had 15 minutes to work with the can before I wouldn't be able to pull it out.
Well, next in line will be to get a torch. I already have the propane but I will need to pick up a torch similar to this one...
Then I will set it up and try it out on a knife blank. Pictures to follow!


Comments
Post a Comment